Friday, March 29, 2013

Spring Entertaining

Thought you could use a little inspiration for your Easter or Passover table.  

Whether you are hosting a crowd or having a marvelous brunch for your immediate family this weekend, make it special! 


Happy Weekend.  M.


Wednesday, March 27, 2013

Turkish Bath Towels

These have been popular outside the U.S. for some time now; but I'm beginning to see more and more of them popping up here.  Are you familiar with these?  They are a very large, thin super absorbent bath sheet made of linen.  


They can be used like a beach towel (or even a blanket) or in the bathroom as a large body towel.  
I'm such a sucker for textiles so these are right up my alley.  After a short search, I've discovered the prices for these cover a huge range.  So, buyer beware!  Here are just a few that are priced right! 
Since Spring is upon us, I'm beginning to think about warmer weather and the beach (thank heavens swimsuit weather is still a few months out for me).  In the meantime,  I can always stock up on some key items for the beach bag!  So where do you line up on these?  Do you love or hate them? M.


Monday, March 25, 2013

The Mirror Rule

Sometimes a rule gets jumbled.  I had a client say to me, "I know your rule on not putting a mirror over the fireplace because so and so said you wouldn't let her put a mirror over her fireplace."  The truth is - I don't have any set rules on these kinds of things!  But, I do have specific reasons for why I place things (or recommend to my clients to place things) in certain places.

For the record, here's my thoughts on mirrors.  First, I adore them.  They are truly necessary for your space to feel interesting and varied (you shouldn't have a room full of oil paintings - too much of one note).  But you MUST think about what the mirror is reflecting when you put it in your space - it's just that simple.  Often, if you place a mirror over your mantel, it will reflect a bare white (or even worse, popcorn) ceiling.  Or, heaven forbid, a ceiling fan! (here's the inside joke on the Ceiling Fans).  So, this is the main reason, that over the fireplace is usually the last place I will consider for mirror placement.

Caveat: If I'm in a pinch and need something large over a fireplace, and the client does not have the right size painting, I will place a mirror over the fireplace.  But, I always try to layer something over the mirror to distract from the reflection (if it's of the ceiling).  Here is an example of just that (in a very stunning room I might add).
  
With that said, here is the perfect example of how to use a mirror to get that Wow factor.  Look at all the yumminess this mirror is reflecting.
When the mirror itself becomes art - you've placed it in the right place! M. 

Friday, March 15, 2013

Randomness and a Little Break

Happy Friday, all.  The last few days the weather has been totally marvelous with tons of sunshine and mild temperatures.  It truly feels like Spring is here and just in time for Spring Break!  My kiddos are on break next week, so I am taking some time off the blog to spend as much time with them as possible.  Never fear current clients, I'm still going to be working on your design plans, just not taking any consults next week.  

My son recently turn 13, and I had a jolt of reality - he'll be driving in three years and out of my house in five years.  So, I'm making a conscious effort to spend more time with my children as this precious time is fleeting. 

 It's truly a matter of priorities in life and this is a very important one that I don't want to look back on and have regrets.  
So, I say all this to say - I'm taking next week off from the blog!  A little break for Spring. 

In the meantime, I have to show you some things I stumbled upon over the last few weeks.  Since I'm constantly sourcing items for design plans, I rarely see things totally different and new.  When I do, they tend to stop me dead in my tracks and I start thinking of ways to include them in my designs.    Some may be too edgy for mainstream consumption, but all are interesting and get my wheels turning.  

The Ghostly Host
A slipcovered ghost chair!  These are totally intriguing to me.  They have a balance between modern and french traditional that I adore.  I will have to find the perfect space in incorporate one or two! 

Careful - Your Lacquer's Showing
Most of you have seen lacquered walls like this. . . 

Lacquered walls can be totally stunning and dramatic.  They have an equally impressive Wow factor to wallpaper but with an understated nod.   But, it's a game changer when you consider it on the front door!

Even in a safe traditional color, it's a Wow . . . 

But, you are truly taking it to a whole new place with a pop of color.  
If you've ever wondered how to achieve this look, it starts with the paint - Fine Paints of Europe to be exact.  Not to mention a painter who knows what they're doing.  This paint has a very special application - consider yourself warned.  As an aside, I think this paint could even make that 1970's door something special.  It would be embracing it and making a statement with it.

J.A. Meets J.C.
Have you heard all the rumblings about Jonathan Adler creating a home decor line for JC Penney?  It's true.  Borrowing the phrase "Happy Chic" from his oh so fabulous book, Mr. Adler is bringing it to Penney's (of all places?!).  

The website says coming March 2013, but it has yet to go live.  And yes, confessions, I have been checking the website like a 15 year old who just tried out for cheerleader checks for the team list!  If any of you find out it's live, please send me an email.  I would love a bit of jump on the selections.  
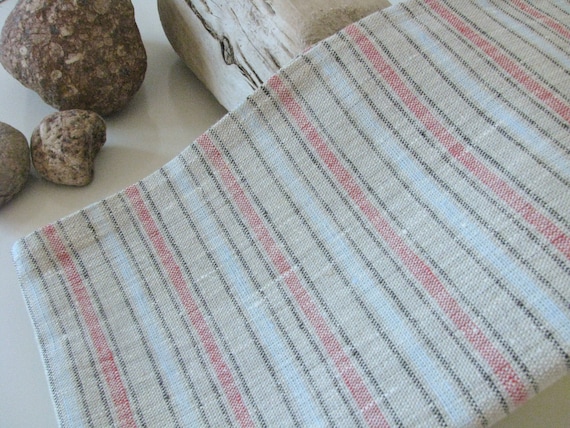
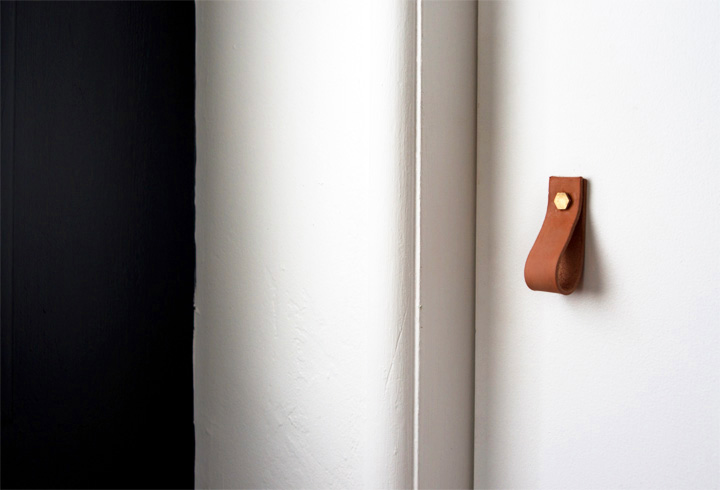
Clever DIY
OK, everybody knows what a sucker I am for a good DIY.  I saw this leather/brass pull on Pinterest and a world of opportunities flooded my brain on where I could use this.

You could freshen up a piece of furniture with these pulls, cabinetry in a bathroom (like my son's that is in desperate need of a freshen up), or even a simple detail on an upholstered piece like the sides of an ottoman.  
Again, endless applications.  Remember, the devil's in the details and they can make a space.

Invitation for a Roast
Lastly, I enjoyed this entertaining post from one of the editor's at Houzz and just had to share it.  The article is entitled, "What is your Designer's Attitude Type?" and it's illustrated in a very funny way!    So, for those of you who have worked with me on spaces, I invite you to share your thoughts on my type.  I do realize I'm completely opening myself up here.  After all, it's healthy to be able to laugh at one's self.  Right?!  Here's the article - What is Your Designer's Attitude Type? 

Happy Spring! M.

Monday, March 11, 2013

Project in Progress - Lake House Update V

The installation of the screened in porch is complete!  If you are new around here and would like to get up to speed on this project you will need to start here - Part I, Part II, Part III, Part IV.

Have you ever read an interior design blogs post about a project a designer is currently working on -  only to find they never do a follow up post on the completed project?  It can be very frustrating when you REALLY want to see that finished project.  And I use the word "finished" lightly here because you and I both know spaces evolve over time.  

Well, today, I'm going to show you the finished product.  
Remember, here's the design layout board for the screened in porch.

And here are a few images of the space after installation.  Look at that view! This image was taken from inside the family room (you can sort of see the reflection of the glass).

Here is the finished structure.  It has completely transformed the house.

This is the side entrance to the screened in porch.  As you can see, they still have a very nice outdoor space to enjoy the lake. 

We did a white wash finish on the ceiling to keep things like and airy and to give us the contrast we needed to show off the gorgeous chandelier and ceiling fans. 

Here's a image of the space at night. 

Looking to the family room.  I think I mentioned this to you before, but it's worth a second mention.  Do you see the door to the left?  This small change provide huge benefits to the space.  Previously, the door opened into the family room which (as you can see) is a very narrow space.  By changing it out with a glass paneled door and allowing it to open into the screened in porch we have gained floor space in the family room and created visual openness by allowing your eye to "steal" the outdoor space through the glass panes.  Small change, huge impact. 

We decided to edit out the pair of chairs (at least for now) that were separating the seating area from the dining area.  The clients will live with this layout for the summer and decide if they think additional seating is essential.  The space still feels finished without the chairs and gives a very open feeling. 

This is the view from the lake side - notice the cement side tables next to the screen.  It's important to consider using materials that can withstand the elements in spots near the screen. 

I'm thrilled she decided to go with the trolix chairs out here.  I just love the industrial, rustic vibe they give the space.  As an aside, I originally gave the client two options for the trolix chairs - a less expensive one with arms and these (which were still quite affordable, compared to the original trolix chairs).  They ended up going with the more expensive option.  I'm so glad they did because the chairs without arms have allowed for more seating at the table. 

I also love this spot.  This is what you see when you walk out the back door.  These "sight lines" are so important to think about when you are designing a space.  You really want to see something interesting when you walk by the back door and look beyond.  Also love the additional chairs when you have extra guests as these can be pulled up to the seating area. 

Ok, so I couldn't resist.  Here is the before . . .  

And here's the after . . . 

Lastly, I don't think I showed you a picture of the complete front gable.  

Even their cute dog, Rusty is thrilled with the results.  Now they are truly ready for a memorable summer!  M.

Friday, March 8, 2013

What Matters Is On the Inside


I've been thinking about sharing this post with you for awhile.  But, it's not the most glamorous of topics; and it always seems to get pushed to the back of the list of posts when something more interesting pops into my brain.
No, I'm not talking about your character.  This is an interior design blog, remember?! I'm talking about pillow inserts!  The topic can be boring, I admit.  So, in an effort to encourage you to read on, I'm going to include some of my favorite images with luscious pillows.  
Now, don't let the lack of glamour of a pillow insert fool you - what I'm about to share is some real inside scoop and will completely transform your spaces.   While the fabric you select for your pillows is very important, what's inside the pillow cover is essential to the look.

Since it is not seen, most people do not realize how important it is (like properly hung drapery panels which is entirely separate post I must get to at some point).  I don't say this lightly - the pillow insert can take your pillow to a whole new place.   In fact, I've had clients who have asked for new pillows and instead I talked them into simply ordering the proper insert only to find the covers look fantastic and did not need to be replaced. 

Show Me What You're Made Of!
In order to get your pillows to look like a magazine spread, you need to use feather/down inserts.  Now, I can hear some of you now saying, "I had a decorator talk me into down pillows and we had feathers everywhere.  They made my pillows prickly."   

Well, your decorator did not select the right feather/down composition for the inserts!  You see, the insert needs to have just the right about of feathers - too many and they stick you and too few and the pillow is as flat as a pancake.   

The goal is to have a ratio which will make the pillows plump and full, but when you lean on them, they envelope you in a cozy way.  Now!  I've got you thinking about it.  Who doesn't want to be enveloped? Right?!

So, what's the magical ratio?  My preference is an insert with a composition of 70 feather/30 down.

Does Size Really Matter?
I knew that subtitle would get your attention!  OK, so we are still not finished here.  The composition of the insert will take you just so far.  We also need to address the proper size of the insert as it relates to the cover size.

For the pillow to "fluff" up and show off the beautiful fabric you've selected, the insert needs to be one inch wider and one inch taller than the cover.  In my opinion this is the perfect size.  Some people recommend a 2" larger insert.  But with the 70/30 composition,  I think the 2" rule makes the pillow so tight it does not feel cozy when you lie back on it.  PS: this trick will not work with a poly insert!  I've had clients who have mistakenly tried! You cannot stuff a poly insert of this size into your cover - bad idea.

Now you know the trick!  Shhh. Keep it under your hat.  Happy Weekend. M.

PS: if you would like help sourcing pillows or inserts for your pillows, contact me.  I can help you!  I have access to lots of sources - Mandi Smith T Interiors.

All images in this post are via Pinterest
  

Monday, March 4, 2013

Art Resin

This past weekend, we took a couple's trip to Charleston.  It was incredibly fun; and in addition to some amazing meals, spa treatments, and conversations with some dear friends from Chicago, I managed to do a little shopping.  I popped into an art gallery right on King Street called Atelier Gallery.  They were so friendly.

I did a quick walk through and stopped dead in my tracks when I saw this . . . 
It's by Yury Darashkevich and it's entitled "Flamenco Dancer."  What you can't really appreciate from this online image is the piece is an oil painting with a super high gloss epoxy coating over top (called art resin).  Think high gloss lacquer.  The effect is a totally modern vibe to an otherwise traditional painting.  It was simply divine.   Unfortunately, for me, this piece is $15,000.00.  So, it's not in the budget.

But, it made me realize I must have one of these!!!  So, I did a little research and discovered you can apply the art resin to almost any painting to give it a high end finish.  I'm thinking this may give an ordinary (I dare say, mass produced) painting some much needed high end appeal. 

Here's just one (of many) you tube videos showing you step by step how to apply art resin to a painting -  Art Resin Project.   I have to say, it looks rather easy - Hmmmm - thinking this sounds like a project in the making - now all I need is a piece of artwork to try my hand at applying the resin!  I would love to hear if any of you have done this before!  M.