Friday, November 30, 2012

The MacGyver of Crafting

At the risk of sounding bitter, I wonder what Martha Stewart could do with a pack of rubber bands, some dryer sheets and some used chewing gum found under the kitchen table?  

Something fabulous I'm sure.  
My Mom and I were brainstorming on my neighborhood gifts this year, and she said, "I think Martha's the only person in the world who could pull off giving you manure as a gift.  She would wrap it up with this marvelous gift tag and double sided satin ribbon that read, 'Homegrown Organic compost to be used when planting your crocus and hyacinth bulbs this Spring.  Enjoy!'"  Of course, the recipient would be oohing and ahhing over it.  

And to prove my point - Exhibit A
Yelp.  Totally fabulous Christmas wreath made from coffee filters.  You go Martha! 

And no, I'm not giving manure as gifts this year!  But if I can squeeze in a couple hours after midnight between now and Christmas, I'm so making one of these. :)  Happy Weekend, everybody!  M.

Wednesday, November 28, 2012

Christmas Trend and An Invitation for You . . .

I just love a good design trend, and for me trend spotting flows right over into decorating for Christmas.  This year the biggest single trend I'm seeing in Christmas decor is earthy elements.  

These would include rustic wood chargers, 

pheasant feathers, 

and pinecones, lots of pinecones.


We traveled to Mississippi for Thanksgiving and while I was there, I picked up a huge bag of pinecones while taking walks on my parents' property.  My plan was to use them throughout our house to bring in that natural element.  I decided to try my hand at making some garland with them for my breakfast room.  I normally don't include a ton of decorations in this space.  But I thought the garland was fun! 

It was super easy, but time consuming - I sat for at least two hours working on it and create about 14 feet total.  

I do love the results but would not be patient enough to create a garland long enough for a stairwell banister or Christmas tree!

  I then included a few pinecones in my centerpiece arrangement on our table.  

My plan is to carry the pinecones throughout the rest of our home for a pulled together look.  I will be showing you pictures of each room as I finish them.  One room down, several more to go!  As my Mom always says, "Honey, you can eat an elephant, if you really want to.  You just have to take it one bite at a time!"  So, one bite at a time. 

An Invitation
 This is a bit of a late notice, but for those who live here in Birmingham, I wanted to extend this very special invitation.  Tonight, Covenant Presbyterian Church is hosting a evening filled with hope and lots of fun,  "hands on" tutorials.  The speaker, Ashley McCary, is a former church member who was diagnosed with a form of cancer in her eye.  Through this devastating ordeal which has resulted in the loss of her eye, Ashley has exhibited a strength of faith that will encourage you and give you a sense of hope that only God can provide.   The evening will begin with Ashley sharing her story.  
Following, there will be holiday tutorials including everything from how to make bows, decorate your mailbox, and make those fabulous gift tags you see on everybody's gifts.  I will also be there demonstrating how to create a beautiful mantle from start to finish.  These tutorials will give you lots to go home and try in your own home.  And the best part, this special night is completely free.  So, if you are in the Birmingham area, grab a friend and join us to celebrate the beginning of a wonderful Christmas season!  (click here for directions)  M. 

Monday, November 26, 2012

Design Perspective - Cantley and Company

I've wanted to feature this uber talented husband/wife team for quite some time.  This wonderful duo has created a very special company of custom bespoke cabinetry in Birmingham, Alabama.  Their custom designs can be seen in some of the most prominent homes in our area.  They've also been featured in numerous magazines and show homes over the years. 

Interestingly, they do not have a website, only a Facebook page.  The reason - they don't need a website.  Their work is the only advertising they seem to need.  So, I'll do the same here with just a sampling of the awesomeness simply known as Cantley and Company.

Marble detailing around a sterling silver sink (yes, I did say sterling silver).

Ceiling - need I say more.
Here is a cute picture of Keith Cantley doing what he does best!  


What a fabulous place to serve a drink.
 The details in the kitchen below simply blew my mind.  Most kitchens you see these days are all tripped out with marble, including the focal point area behind the stove.  Look closely here, the area is made of plank boards and gorgeous detail trim - all done in wood.  Talk about a price savings, and it's lovely.    
Here's a close up.  This is a very clever way to save some money - also the perfect pairing with those oversized rustic wall sconces with linen shield shades.
One other clever detail.  Notice the upper cabinets - not unusual to see glass fronts on cabinetry.  But it is unusual to see glass wrapped around the sides.  It gives the cabinets a completely different look and feel.  Amazing how such a small detail can transform a kitchen.  Simply love this.
One last view of this kitchen (sorry it's blurry), notice the open shelving and cabinetry near the door (to the right).  It gives this kitchen a very eclectic (I dare say modern) element.  Just love it. 


In the image below, I would never have thought to use the old fashion school house blinds in this kitchen.  But it gives the perfect amount to dark color to tie in the lighting and the stained wood island.
Another detail (in the image below) which really makes a huge difference - notice the stained wood trim between the two windows in this image.  Your natural instinct would be to paint that trim out the same as the cabinetry.  But by choosing to stain it the color of the blinds, the window reads as one large window rather than two small windows.  The color again helps to tie in all the other dark brown elements in the space.  Perfect solution. 
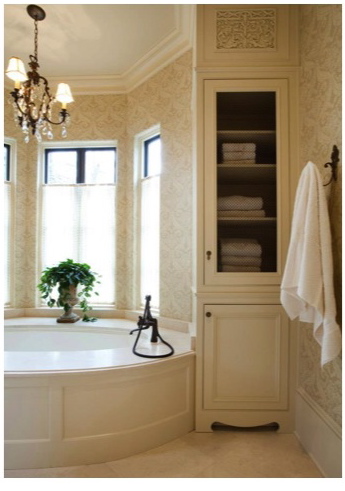
I wanted to include this one to remind you that custom cabinetry is not just for the kitchen.  Look at the lovely curved tub and furniture detailing on the base of the built in cabinetry. 
 
More goodness.


I really think this family owned business has a very special thing going.  Such Wow factor is very difficult to achieve, and they pull it off effortlessly.  M.

Friday, November 23, 2012

Christmas Stocking Tutorial

Earlier this week, I promised to share with you how I made our Christmas stocking last year.  It was a fun affordable way to get a custom look.  I hope you try it for your own home! 
image via Mandi Smith T Interiors

Step One: I took some leftover suede fabric (I used it to make lumbar pillows for chairs in my family room), and had it monogrammed with our names.  I chose chocolate for the lettering just to keep it neutral.  For those local, I had these done at Smith's Variety.

Using one of our stockings from the previous year, I created a pattern from leftover wrapping paper (see all that red in that paper - told you!).

Using the pattern, I cut out one linen "back" for the stocking.

Then I folded down the header of the pattern and cut out one linen "front" for the stocking.  If you want to make this easier, you can simply cut out two linen pieces of the same size and simply overlay the monogramming on top of it.

Then using a liner fabric (I used a thick cream cotton), cut out two liner stockings.  These will be inside the stocking and help to finish all the edges nicely.

Once you get your monogramming complete - with same sides together, sew the bottom of the monogrammed piece to the top of the front linen stocking.

It will look like this (and yes, I did make one for our cute dog, Lottie).

Then using a wide satin ribbon, pin it to the stocking (making sure to center it on the seam you just created).

Then top stitch the ribbon to the stocking on both edges.

Place your pattern on top of what you have sewn so far and trim off any excess fabric.

You now have the finished front of the stocking.  It will look like this.  Just an aside, it would have made the sewing so much easier if I had not rounded the top of the stocking.  A straight line across the top and down the sides would have been much, much easier.

Now it's time to attach the liner to the linen pieces.  Place one liner piece on top of your finished front.

Also place a liner piece on top of your linen back stocking piece and pin these together at the tops only.   Once pinned you will sew these together just at the tops on both pieces (this is where it would have been easier had it been a straight seam.  Then you will open them up to reveal this seam.

Both front and back will look like the picture below.  Now it's time to sew the two long pieces to each other along the sides.  I the image below I have sandwiched the pieces together.  The bottom piece is the liner and back linen (sewn together at the tops) and the top piece is the liner and front linen piece sewn together at the top.  So, to be clear as mud, the liners are matched up on the left and the stocking pieces are matched up on the right (with right sides together).   You will pin these two long pieces together all the way around with the exception of the bottom of the two liner pieces.

Here's a close up of the one place where you will not sew them together.

Once sewn together, you will reach into the opening and pull the stocking out so that the right (or correct) sides are showing.  Much like "righting" a sock before throwing it into the wash (that never happens around here!! Ha!).

Here's a picture of me reaching inside to "right" the stocking.

I took several pictures of this because it is one of my favorite parts about sewing.  I always think - Wow, It worked!

Once you've pulled this stocking through, all you need to do to finish it is whip stitch the opening in the liner closed.  Remember this does not have to be pretty because it will be buried inside the stocking.

Now, last step!  You need a loop to allow you to hook the stocking onto the mantle.  Rather than making this hard, I decided to use leather string.  I think it adds some interesting texture too.

I cut even lengths of leather (so that all the stockings would hang at the same level), and I tied a decorative knot on both ends of each piece.

Then, using a sewing marker (which disappears when you wet it), I made two even marks on each stocking where I wanted to sew the leather strips.

You could do this part by hand, but I'm lazy and wanted to use the machine.  So to do this, you will need to select a zig zag stitch on your machine and drop your feed dogs (which will prevent the fabric from moving), and stitch back and forth in one single spot over the leather end.  You will do this for each of the two knots on the stocking.

If you look closely you can see where I did this.  I used the clear monofilament thread to make it less noticeable in the finished product.

Here are all five (including Lottie!) finished stockings.

And here is how it will hang from the leather strips.

I know this sounds like a lot of steps.  But once you get one under your belt, you can easily get the others finished.  M.