Thursday, March 31, 2011

Make the Most of the Evening Light

I love it when I first notice that it is light much later in the evenings.  Even though the days are still a bit chilly, it tells me that summer is indeed around the corner.  This time of year is so busy with my kids' after school activities.  It's so easy to get caught up in the shuttling around and forget to enjoy this wonderful time of year.  

So, I thought I would give you a few images to dwell upon today.  


P.S. The new issue of Australian online Magazine Adore Home is just out, and it is not to be missed.  I know what I'm going to be doing when I get a little down time!  M.

Wednesday, March 30, 2011

Trina, You Rock!

Here are just a few of Ms. Turk's 2011 Spring fabric offerings from Schumacher.  Would be perfect for freshening up a bit on the patio!!!!

These remind me of a fantastic resort pool.
O cabana boy - can we get some refreshments over here!

These remind me of the beach.  I would even consider a swimsuit coverup in that peacock fabric!  But wait, she's already got that covered - Friends, if that didn't make you want to hit the gym, nothing will!

Have a great day! M.

Tuesday, March 29, 2011

Project in Progress - Big Girl Room

Just wanted to share a project I'm working on for a client.  She read the posts I did on a Bedroom Freshen Up and Playroom Dreaming and wanted me to do the same for her daughter's room!  

Here's the story - She's moving her daughter out of the crib into a real bed and wants to give the room a big girl look without breaking the bank.  For starters, she already has the bed which is a lovely amber colored spool bed (sorry I don't have a picture, but take my word for it, it's lovely).  She also has a bedside table in a similar tone of wood.  In addition to the bed, she has roman shades (left from the previous homeowner) in a pink window pane fabric that is trimmed in a thin green tape. (I have encouraged her to use these since they are in great shape and since pink is the color of the year!)


She also has a simple matelasse coverlet and bedskirt in white.  So, a basic start to a room!  Also, I will tell you that my client is young and hip and wants something unexpected, maybe even a bit sophisticated for this space.  The main reason is this room also acts as the guest bedroom when family and friends come to town, so it needs to play double duty.  Lastly, she is on a tight budget for this "freshen up" so every single dollar must add tons of impact.  The goal was to keep it around $350.00.

OK, so that is what I started with and here are two options I have given her for the room.  Why Two? Because a girl needs options (and because I simply cannot help myself when I start working on these projects!)

Option #1 is just a bit more expensive at a grand total of $345.44.  


Option 2 has a brighter, bolder feel, but would also make a fun big girl room.  
The grand total for this "freshen up"- $322.49.


I would love to know which you prefer!  It might help her make a decision.  M.


Monday, March 28, 2011

Work with What you have


Are there are times when you look at certain rooms in your home and think, "Can I just start over?"  The reality is few people have the luxury of starting completely over with a room.  So, we must work with what we have.  The key is to embrace it and make it work!  

You would be amazed at how fantastic a room can look simply by working with what you have.  These are pictures of some of my favorite redesigns I've worked on over the years.  

Everything you see in these photos, the homeowner already had.  There are no new pieces - just her furnishings moved around a bit.

There is a fireplace opposite this chest which balances the room.
This wall was stark and a bit depressing.

Making it the perfect place for a vignette.  The homeowner had these lovely nude etchings; and when grouped together, they create a point of interest. 

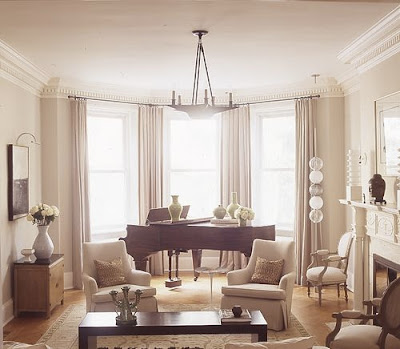
Different homeowner in this photo.  This was a formal living room and the biggest problem with this room - the windows on the right were not centered on the wall or  on the fireplace, so the sofa was not working on this wall. 

The solution - float the sofa and place a long sofa table (which was hidden behind those two floral slipper chairs) on the window wall.  The two club chairs were upstairs in the homeowners master bedroom.  By trading them with the floral slipper chairs, you get this wonderful view when you first enter the home. 

This was one of my the very first redesigns.  Obviously, just cleaning up helped!  But, I also created some interested on the long wall to the left by separating the entertainment unit and using the two side panels as one large bookshelf.

This made the seating area feel more cozy.

Also notice, you don't have to put the books on the shelf in such a conventional way.  Think outside the box. 

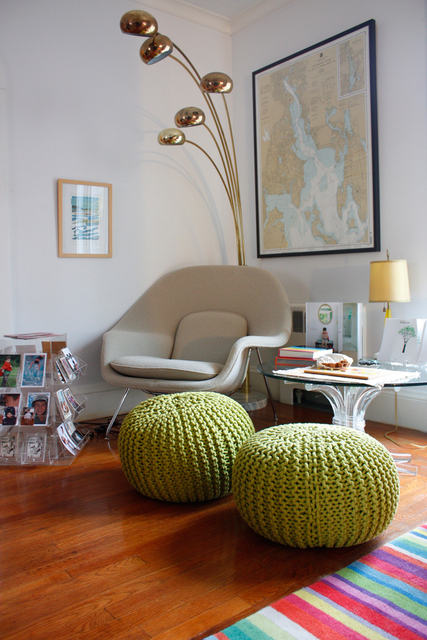
This was a small sitting area on the main floor of this home.

By moving the large sofa and chair to the downstairs TV room (since you want to be able to lounge in front of the TV), this space became more of a reading niche or even a place to relax in the evening. 

This was one of my favorites - very challenging layout (there was no wall for the sofa in this space). Notice the dining room in the "L" shaped space beyond.  In this case, flipping the living room and dining room solved the problem.  That gave the sofa a wall! 

This allowed me to create this beautiful vignette as the first thing you see when entering the home.  The artwork was done by the homeowner's son, and she simply adored being able to see it when she first walk in her home.  

I hope these give you inspiration for your own home.  Remember:  Before you throw the baby out with the bath water, think of the possibilities!!! 

Hope you have a marvelous day. M.

PS: My friend Marie over at Howard House Reviews has awarded me the Stylish Blog award!  I love it when other bloggers recognize your efforts.  It makes my day (just like lovely comments do)!   If you get a chance you should check out Marie's blog.  She helped promote by most recent giveaway and has daily finds (if you are in the mood for free stuff).  Thanks Marie!  Also, if you would like to read about my "seven things" I posted about it here.  


Friday, March 25, 2011

What Shall I Wear Today?

At least that's what I would think if I lived here . . . 

I hope everybody has a wonderful weekend.  Enjoy it!  M.

Thursday, March 24, 2011

Atomic Era Lamps

These days there are so many online resources for accessories.  So, when I find one that really stands out as unique I bookmark it and shop it often.  That has been the case with Laurel Leaf Farm for quite some time.  I love the site because it has unique stuff that hasn't been "dolled up."  You do have to dig(yes, even online), but the deals are great.  

Recently, I went to their site to source some brass accessories and discovered their sister website known as 1st Stop Retro Shop!  Well, let's just say:

 IT'S THE BOMB!
 And in this case . . . the Atomic bomb (cheesy, huh? Sorry, I couldn't resist).

I stumbled upon these Atomic Era lamps which are so cool.  The Atomic Era developed due to a time in our history when the atomic bomb and nuclear energy were being discovered/considered for defense/energy for our country.  During this period of time, interior design began to reflect our political circumstances.  After all, designers do not design in a vacuum.  It is also worth noting this was during the midcentury modern upsurge, so these pieces have modern lines.

So, there's your history lesson for the day, on to the finds!

Atomic Ear Brass Lamps - these would really bring an authentic layer to any space.  And that is what you want in your home, not something that looks like it came straight from a catalog.  Rather, something that has developed over time into your space.  

These are $60 for the pair (you can't even find this kind of deal on Craig's list anymore)! 

This one is also $60 and would be amazing on a bedside table or in a study - great patina.

And last, but not least, (this one is my favorite) this beauty is $50.  It would look unbelievable as an accent lamp on a traditional bow front chest with other accessories including a large piece of modern art to really balance the traditional casement piece. 

Here's a little inspiration on mixing this modern style with more traditional pieces.


Wednesday, March 23, 2011

Design Perspective- Jesse Carrier & Mara Miller

This husband and wife team really make me want to inject a more modern vibe into my spaces.


Happy midweek! M.

Tuesday, March 22, 2011

That's One Big Baby

Several years ago we purchased a baby grand piano for our living room.  Although I'm not musical (trust me, I am not being modest here), my husband's family is very inclined.  They can sing beautifully and play a number of instruments, including the piano.  So, it was natural for us to hope that at least one of our children would be interested in learning to play.  For me, the thought of getting a baby grand was sheer bliss just from a decorating standpoint.  I was thrilled until . . . it arrived.  It was ENORMOUS (and by baby grand standards, ours is on the smaller side).

I quickly realized I was not dealing with a wall flower - they are big, bulky and the shape refuses to allow one to be placed against a wall.  While I'm not a "wall hugger," (OK, I just made this term up.  But, you know the type. "Wall huggers" are those who push all the furniture against the walls in their space.)  I still found it difficult to make the room feel right.  When you throw a huge, awkwardly shaped piano in the mix, it can truly debilitate even the most seasoned of decorators.  

So, I thought I would share some lessons learned on working with a baby grand.  Remember: these are tips not rules and they may or may not work in your room.  


5 Tips When Working with a Baby Grand


Tip #1 Make it the Focal Point
Consider the piano the focal point of the room.  I have talked at length about the need for every room to have a focal point, and with a baby grand you have the perfect piece!

I love how the rest of the furnishings in this space are neutral which adds to the drama of the piano.  Also, notice the modern moldings on the accent wall.  These help to frame the piano, but since they are painted out the wall color, it does not distract from the main attraction.


Tip #2 Consider How the Piano Opens
When creating the seating arrangements for the space, consider how the piano will open and arranged the seating to optimize this side of the piano (if possible).

This photograph is a perfect example of this tip.  The piano lid opens to the seating area for optimal sound.  I also love the small stools for additional seating.  Can't you just see a small child perch on one of these singing "My Favorite Things" as the piano is being played.

Tip #3 Place Piano Opposite Windows (when Possible)
Since humidity and temperature both effect the sound of a piano, consider  placing yours opposite any windows.  Now, I know many of you have your baby grands in a bay window (I have even placed them there in redesigns we have completed) and it looks stunning.  Just know that you will need to tune it more often if this is the case.

See how the piano is pulled away from the windows.  The homeowner could have easily placed it in the corner with the windows, but instead choose to create a seating area on that side of the room.  Also, this is a great photo to mention that the top of the piano is a wonderful place to display accessories or flowers.  Also, notice the ottoman tucked under the curved side of the piano.

Now, for the bay window exception.  These are just too beautiful not to show you!

I adore the hazy light of this photograph.  It makes me think this picture was taken in the morning as the sun was rising.  Just loving.  

The high ceiling and placement of this piano really creates a statement in this space. 

Notice the piano chair (rather than bench) in this space and the chaise for lying back, closing your eyes and enjoying the music! If I had this set up in my living room, my kids would hate me!  I would make them play constantly for me.

Tip #4 Pick the Best Profile
If  your room has limited space, consider rotating the piano so that the smallest side (furtherest from the keys) of the piano is the first thing you see when entering the room.  You will be shocked at the visual difference this can make - sort of like being photographed head on as opposed to turning to the side (Don't act like you don't know what I'm talking about, friends!)

This is the perfect place for this piano.  Notice the small end of the piano faces out thus allowing this small space to visually accommodate the piano. In fact this room follows all my tips for placement (away from windows with lid facing the seating area).  Love it!!

Notice in this image not all the tips could be accommodated.  While placing it opposite the windows and rotating it so the small end is seen first, the homeowner was not able to have the lid open to the seating area.  But again, these are simply tips, not rules!
{image via}

Tip #5 Think Outside the Living Room
The living room is not the only room you should consider when incorporating a baby grand piano.

This would really make an impression if you hired someone to play through dinner or even invited a guest to play during coffee and dessert!


I am guessing this is not the formal living room based on the inclusion of the game table, but it illustrates my point that the piano does work in different rooms.